


Everyman's Guide To Terrain - Chest-high Walls
Hi, I'm Jared.
In this column I am going to be showing you how I made some bits of fantasy wargaming terrain on a fairly limited budget. I am by no means an expert at terrain making – if I can make this stuff you definitely can too. What I'm trying to achieve here is to inspire some people who have maybe never considered making terrain before, and hopefully foster a community where we can all share tips and show off the cool stuff we've made. I want to be able to show up to a wargame evening at Hobby Master and be able to throw down with someone among some scenery that someone has invested some soul into and has a bit of back story.
For my first article, I will be showing you how I made a couple of stone block chest-high walls. These are not examples of fine dwarven craftsmanship. These were made by poorly paid labourers who just wanted to get home and enjoy a nice plate of turnips.
My tools and materials:
For this project I used a large bladed box cutter, a hot glue gun, a paint brush (about the size you'd want for dry-brushing a 40k tank) and a sponge.
For materials, I used some scavenged polystyrene packaging from a printer, and some acrylic paints
Step 1: Cutting bricks
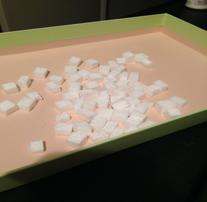
These little guys form the basis of quite a few of my projects, so I've made a million of 'em.
To make them I just hack a chunk off of a piece of polystyrene packaging. It can be as rough as you need it to be, as precision is not what we are going for here. Then cut that hunk into roughly 6mm thick slices, just like you'd cut a loaf of bread or something. It is very important to never measure anything here. Just eyeball it because the more small variances there are between your individual bricks, the more interesting the texture of your stonework will be.
Take one of your foam slices and cut it into 6mm thick strips. This will give you a collection of sticks which are 6mm x 6mm x however long your bit of foam was.
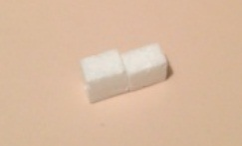
Finally, take one of your foam sticks and cut it into 10mm lengths. You will end up with a pile of bricks which are 6mm x 6mm x 10mm. Generally when I do this, I bundle a few sticks together so I'm making several bricks at a time.
Put those bricks in a container that is easy to access, as you'll be needing to get at them rapidly once you begin deploying hot glue.
Step 2: Building your chest high walls
Take one foam brick and put a wee dab of hot glue on one of the short ends. Be careful not hold the tip of the glue gun too close to the foam or it could melt it.
Attach the short end of another brick to the glue blob you just made (as shown below). You'll want the bottom edge of the wall to be flat, so use a tabletop or something to keep things in line at first. Lay down some paper first or you'll glue your bricks to the table!
Glue more bricks to the end of your line until you reach the desired length for your wall.
With the next row up, you can apply a line of glue to the tops of the existing bricks and stick on all of the bricks in quick succession. Make sure to offset them from the bottom layer a bit to give the structure a bit of strength.
For the third and final row, offset your bricks again so that this time they're more or less in line with the first row. I suggest having some missing bricks from this layer to create a bit of visual interest.
As a bit of extra detail, and to help the wall balance, glue some little piles of bricks to each side of the base of the wall at various intervals along it.
Step 3: Painting the wall
I use Two Dollar Shop acrylics when I'm painting up my terrain. It's nice and cheap, which is good because you'll use a lot of it. The available colours can be a bit limited, so you'll sometimes have to do a lot of mixing.
For your undercoat, mix grey and black to make... dark grey. Apply this coat with a brush so you can get in all the cracks. It's a tempting idea to use spray paint at this point but DON'T DO IT! The chemicals used in spray paint can cause your polystyrene bricks to melt and ruin your hard work so far.
Next up use the basic shade of grey straight out of the tube, and apply it with a sponge to all the flat surfaces, leaving the dark grey in the cracks.
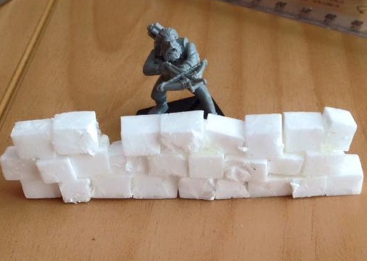
Finally, add some white to the leftover grey and do an edge drybrush, again with a sponge.
You'll end up with something like this:
Parting thoughts:
The best thing about these things is how very cheap they are. They cost me about a dollar to make, not including my own time (which is basically worthless to be fair). They look pretty good too. They'd look even better with a bit of moss on 'em, but I've not experimented with moss simulations yet, but some green flock stuck on with PVA would do the trick nicely I'd say.
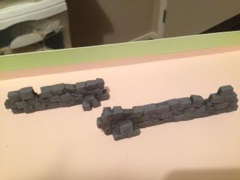
One thing to watch out for is that these pieces are very, very light, so are quite easy to bump if you're not extremely careful, therefore it would be a good idea to put them on bases to give them a bit of weight. I haven't based my ones, but when I do base ruined structures I tend to apply a gravel flock to them to represent additional small rubble. You can pick up a wide range of flock from Hobbymaster.
Coming up next time:
I'll be empolying that same brickwork technique to make a ruined stone tower foundations. In the meantime I'd love to see your comments, feel free to comment on the Hobbymaster Facebook page. Did you have a go at making some of these? How did they go? Would you use any different techniques to mine? Share your advice and photos of your pieces. We're all in this hobby together.
![]()
Jared Pinfold

Jared has been gaming for decades, ever since a friend introduced him to Dungeons and Dragons as a kid. He's played a lot of tabletop and card games along the way, and now spends his time making terrain and new games to play on it.